by Jason Zandri
www.2000trainers.com
Welcome to this week’s
installment of Windows XP Professional Exam (70-270) in 15 minutes a week,
the second in this series. This article covers attended installations of
Windows XP Professional from a CD-ROM.
Jason Zandri’s latest article in the Learning Windows XP Professional in 15 Minutes a Week series covers the four stages of an attended installation of Windows XP Professional from a CD-ROM.
Installing
Windows XP Professional from a CD-ROM to a clean hard disk consists of these
four stages:
Running
the Setup program – Partitions and formats the
hard disk (if required) for the installation to proceed and copies the files
necessary to run the Setup Wizard.
Running
the Setup Wizard – Requests setup information
about the local workstation where the installation is taking place.
Networking components – Installs the networking
components that allow the computer to communicate with other computers on
the local network.
Completing the installation – This final phase
copies files to the hard drive and configures the final stages of the setup.
There are some noted
differences in the Windows XP Professional installation and older Windows
NT4 and Windows Professional installations.
The design of the
installation program assumes that your system has the ability to boot
directly from a CD-ROM or that you will use a Windows 95/98/ME boot floppy
to begin installing from a CD. The ability to directly create setup floppies
has been dropped from Windows XP. Setup boot disks are available only by
download from Microsoft. The Setup boot disks are available so that you
can run Setup on computers that do not support a bootable CD-ROM.
There are six Windows XP
Setup boot floppy disks. These disks contain the files and drivers that are
required to access the CD-ROM drive through generic PCI drivers and begin
the Setup process.
If your computer does
support booting from a CD-ROM, or if network-based installation is
available, Microsoft recommends that you use those installations methods.
Setup will not prompt the
user to specify the name of an installation folder unless you are performing
an unattended installation or using winnt32 to perform a clean
installation.
By default,
the Setup Wizard installs the Windows XP Professional operating system files
in the WINDOWS folder. If this folder exists on the partition you have
chosen for the install, setup will warn you that you are about to overwrite
the current operating system installed on that partition. In order to keep
it (e.g. dual or multi booting scenario), you would need to choose another
partition for the installation.
To start the Setup program, insert the Windows XP
Professional installation CD-ROM in your CD-ROM drive.
If an operating system is
detected on the hard drive, the following message will appear;
![]()
In this scenario, you would
need to press any key on the keyboard to continue with the CDROM
installation.
After the
computer starts, a minimal version of Windows XP Professional is copied into
memory. This version of Windows XP Professional starts the Setup program.

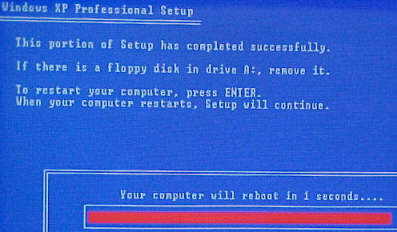
After all
of the files are copied and the system is restarted, the text-mode portion
of Setup is started which prompts you to read and accept a licensing
agreement.

You would
select “F8-I agree” to continue. (If you elect not to accept the agreement,
the installation will end)
You are
then prompted to select a partition on which to install Windows XP
Professional. You can select an existing partition or create a new partition
by using any unpartitioned free space on the hard drive(s).
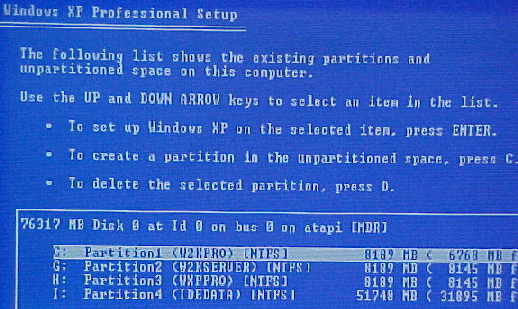
(The above example shows a
partitioned and formatted drive)
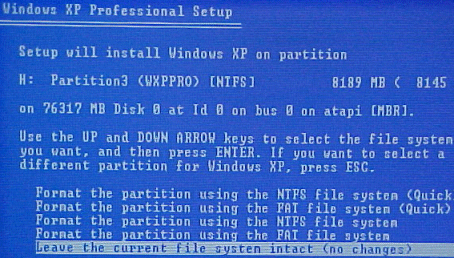
Once a partition has been
selected the next step is to select a file system for the
new partition. Next, Setup formats the partition with the selected file
system. (This would assume that a file system didn’t currently exist. In
this example, one already does and it is formatted in NTFS so I have elected
to leave it as is. Any formatting done here during setup will destroy any
existing data on the partitions formatted.)
From here
Setup copies files to the hard disk and saves configuration information.

Setup
restarts the computer once the file copy is completed and then starts the
Windows XP Professional Setup Wizard, the graphical user interface (GUI)
portion of Setup.